Additive Manufacturing - FYI

SKĒM-INC: 3D PRINTING WITH CASTABLE WAX RESIN TO PROTOTYPE METAL PARTS!

Image credit popular Mechanics: https://www.popularmechanics.com/cars/news/g1863/cirin-3d-rubber-band-race-car/
Image credit popular mechanics at: www.popularmechanics.com

Only have a plastic printer? No worries... you can still create functional metal parts.

This article runs through how we use an SLA (RESIN based) printer to produce metal parts…  As always If you have questions, comments, or would just like to chat about 3D printing, feel free to get ahold of us through the comment section at the bottom of this page or through one of our social media outlets.

3D PRINTING CASTABLE WAX (LOST-WAX CASTING)

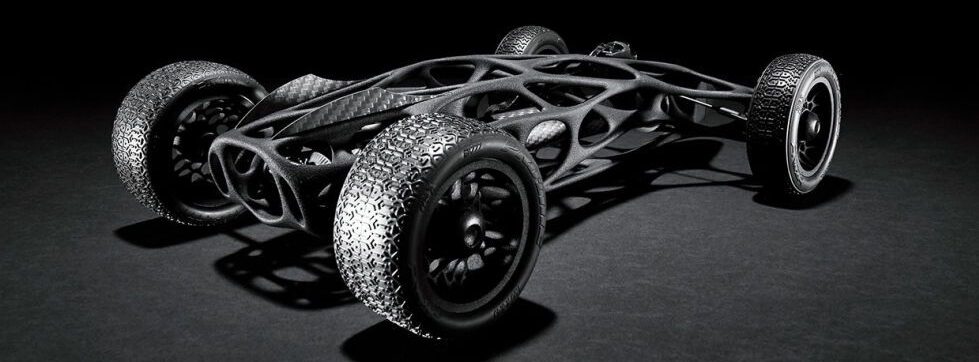
We are talking about Investment casting  which dont get me wrong.  Investment casting has been used for millennia.  However, now we are merging the technology with Additive Manufacturing in order to create some of the most beautiful yet highly functional parts that just couldnt be made or at least weren’t even remotely affordable a short time ago.  In the last few years 3D printing with castable wax resin has became an awesome way to reduce your Prototyping Expense & Labor for that matter.  Especially considering the fact that every day more and more companies are using “Generative Design” techniques in order to reduce weight while still maintaining the strength of the parts machined from billet.  The problem most machining companies are faced with is simple.  COST to produce actual part at it’s optimal design.  The fact is in some cases these designs cannot even be made with conventional subtractive manufacturing methods alone.  Some parts you can look at now and immediately your mind jumps to Metal Additive Manufacturing / 3D printing technology.  However, today I am here to talk to you about another way.  

Image and great article with similar subject can be found at: https://www.ennomotive.com/3d-printing-metal-parts/

Additive manufacturing is becoming more and more reliable and changing efficiancies, profitability and even the saftey of entire industries.  More and more businesses are adapting their workflow to include additive.  The technnology is in dentistry everywhere.  Chances are your grandparents dentures or even your crown has had a 3D printer involved with producing or at least prototyping them.  Medical fields in general have been making the switch for metal and even casts for broken bones etc…  Yet, up to this point 3D printing castable wax parts in the jewlery sector is king.  Nowadays, if you get yourself a small desk top 3D printer you can produce and even sell some jewlery online via etsy, amazon etc… Often the designs are unique 1 of a kind organic designs that really have changed the jewlery landscape.

WORK FLOW for LOST-WAX CASTING PROTOTYPE

The process:  Design it, Print it, Pack it in investment, Heat it (burn out the printed wax part).  Once the wax is out you are left with a negative (mold) of the part and now it’s time to pour the molten material in.  It will take the shape left from the wax part, wait to cool then ship.
The process from start to finish can be very short and fairly inexpesive as well.  That being said the lost wax method generally yields better surface finishes & tolerances than sand casting.  Furthurmore, it allows for easy design changes and minimal draft angles.  Now before 3Dprinting methods (Lost wax has been around for centuries) generally Lost wax is a mid range cost.  This was wether you are comparing it with high or low part quantities and various methods.  Now with use of 3D printing it has become more accessible and has moved the cost and labor involved even lower.
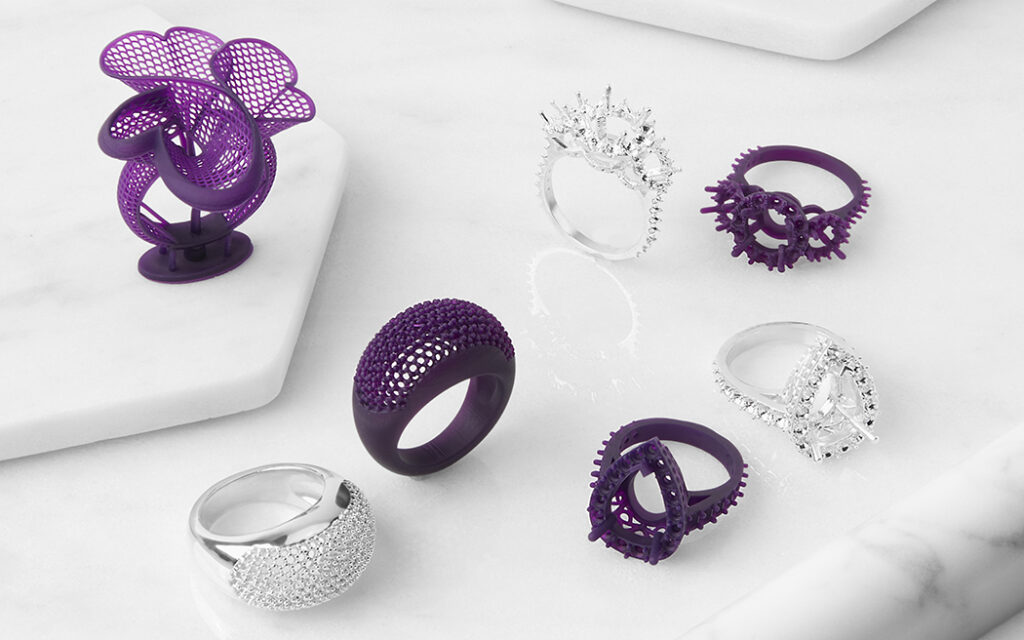
Image and great article with similar subject can be found at: https://formlabs.com/industries/jewelry/

 Sky high machine costs and high material costs involved with metal additive manufacturing…  3D printing at the moment can stil prove to be a tough pill to swallow.  The fact remains additive manufacturing is absolutely perfect for Generative designed parts.  Which generative designed parts are gaining headway in many industries that are starting to see benefits.  In aerospace industry losing 1 lb per commercial airline seat can account for billions of dollars in fuel saved over the life of the fleat.  Lost-wax casting is not perfect for every industry but it can be a way of getting metal prototypes  now…for less up front cost.  The surface finish can also be your guide as to which direction you should take.  Metal 3D printed parts generally have a rough surface finish that would require subsequent operations to get them smooth.  If your looking to buy your own printer the base price of resin printers is way lower and can still offer you a way of getting the job done.  It can almost be a first step into 3D printing metal parts. 

PROOF 3D PRINTING CASTABLE WAX RESIN IS VIABLE

How big are your batches?  How long is it currently taking you to get from point concept to market?  That isnt even half of the questions.  Good manual labor and “tribal” knowledge is becoming harder to come by.  Manufacturing mom and pop shops are starting to struggle just because they cannot find people.  Companies now more than ever need to adapt to servive.  Gone are the times where you work on a ring for days and then set it on a shelf to wait for it to be sold.  Now we are seeing mass customizations in every industry.  Where everything can be designed with the customer sitting right there explaining to you what they want.  Maybe they start with a product you have made before but they’ll need a change here and a tweak there and maybe even two more stones on each side.  Then you can print it and make sure it fits that same day.  Yes, currently we are talking the jewlery industry but mass customization is coming for everything.  In fact I would argue it’s already hear.  Growing day by day. 

As a case in point I have included a short video that was done by a collaboration between Formlabs and Golden Century Casting.  A premium jewlery designer that uses Formlabs Printers to produce 99% of the jewlery they make.  I include it not because you or I are looking to get into jewlery making but I think it allows you to understand what is possible.  What is already happening and most importantly what is not going away.

Along with the video below are links to the companies sites:   https://formlabs.com/industries/ 
https://www.goldencenturycasting.com/ 

More on SLA (Stereolithography)

 Below is a section from a past article that explains SLA (the primary 3D printing method for creating castable wax parts).  If you would like to read the entire article: SLA, SLS and FDM What are the differences click here
In the SLA (Stereolithography) process, the material actually starts as a  liquid resin.  The liquid resin gets hit with UV light causing a chemical reaction at which point the resin begins to harden.  In most industrial cases this is done with a laser.  However, the MSLA (Masked Stereolithography) version of SLA is done with a Matrix of LED lights behind an LCD screen.  The images below are especially helpful to highlight and explain these differences visually.  In each image, the grey on the top represents the build plate which holds the part (upside down) as it is printed.  The blue represents the liquid resin and the yellow is the 405nm light or laser.  Take a look at the image to the right you will see what to me looks like the top view of a basketball hoop…  That is the cured resin (final part).  

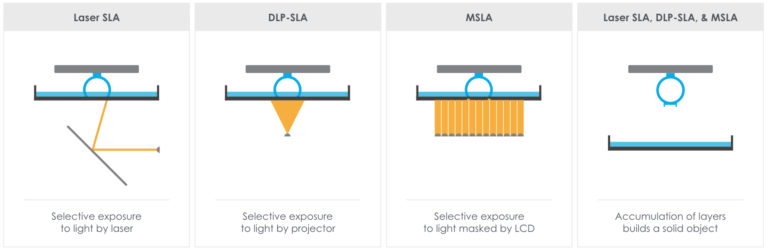
SLA v DLP v MSLA  image credit: Formlabs www.formlabs.com

As you can see, each system shown above is able to produce the same part and all are using light to cure a part in height/layer of ~.02-.3mm at a time.  However, MSLA, is the version that has exploded on to the DIY market within the last few years.  This is because of how inexpensive it is to throw some LED lights under a vat of resin.  Additionally, it is also much faster since you can cure the entire layer at once.  No matter how big the part or how many parts are on the build plate, each layer will take the same amount of time.  This is not the case for both the SLA and SLS methods since they use a laser to trace a 2D layer.  MSLA simply displays a 2D sliced image of the layer it is curing.  With MSLA, most layers take ~8 seconds or less.
When designing a part for SLA printing, there is not much that will need to be changed from one version to the other.  All SLA methods typically require support structures in order to hold the part during the print, which causes a bit of post processing to remove the support structures as well as dimples that may be left over from these supports.  Depending on the surface finish and part quality you are looking to achieve, some additional sanding and painting may be required.  If you see a 3D printed miniature action figure chances are it has been SLA printed.  The ultra fine details you can get topped off by the paintable nature of the resin are what makes SLA the more likely choice.  Below is another great video I found on YouTube from Adafruit Industries.  If you want to see the amount of detail that can be achieved on your parts, be sure to watch until after this miniature space ship gets cleaned!  Check out how tiny those details are!
To visit Adafruit Industries’ YouTube channel click on the link below: 
Click here to read a more in depth article on the different SLA printing techniques.

Please leave a comment below with any questions or suggestions to make our future posts even better!

Leave a Reply

Your email address will not be published. Required fields are marked *