3D Printing – OUR ADDITIVE MANUFACTURING TECHNOLOGIES SLS, SLA & FDM…What is the difference???

SLS (Selective Laser Sintering)

The SLS (Selective Laser Sintering) process is used primarily in industrial applications as the machines are typically outside of the pricerange of the DIY’er and Most small business’s price range.  In SLS process a thin layer of powder is dispersed onto the build platform usually around .1mm or less in thickness depending on the application and machine.  The powder material is then sintered by the Laser.  Again the build plate lowers by the specified layer amount.  Then redistributing a new layer of powder which is then sintered to the previous layer.  This method of printing is advantagious for a couple of reasons. It is capable of producing parts without a support structure as instead the powder that is surrounding the part holds the part suspended in place.  This also allows for the entire build volume to be packed with parts very close together.  In many cases multiple parts to be produced as a complete fully assembled product.  If you are anything like me seeing is believing and also understanding.  Therefore below I have embeded a great video I found on YouTube from D2W (Digits2Widgets) a 3D printing Studio in Central London.  With customers primarily requiring NDA it has been difficult for me to produce a  video that demonstrates the primary advantages of this technology.

To visit D2W YouTube channel click on this link below:                                https://www.youtube.com/user/D2WStudioLondon/videos

SLA (Stereolithography)

In the SLA (Stereolithography) a process that the material actually starts as a photosensitive liquid resin.  Once the resin is hit with UV light it has a chemical reaction and begins to harden in most industrial cases this is done with a laser.  Again as in the SLS method the laser rather simply traces a 2D layer then the build plate moves up (or down depending on your machine and position of the laser) a few millimeters to allow the uncured resin to flow and cover the bottom of the vat.  The build plate moves back down to ~.05mm  above the last layer and then repeats the process.  Tipically this method will require support structures in order to hold the part properly in position during the print.  Which means unlike SLS after the print there is a bit of work to do to the part aside from cleaning it.  You will also need to remove any support structures and possibly sand the dimples that can be left over from these supports depending on the surface finish you are looking to achieve.  Many in the desktop printing world are using this method of printing to produce miniature figurines.  That is because of the still surprisingly awesome detail  you can get from this technology let alone the paintable nature of the primary material used in SLA technology. I’ve embeded a great video I found on YouTube from Adafruit Industries.  Be sure you watch until after this miniature space ship gets all of the extra resin cleaned off of it.  So that you can see the amount of detail that can be achieved in this technology!  Please note how small this part and those details acutally are.

To visit Adafruit Industries YouTube channel click on this link below:                                 https://www.youtube.com/user/adafruit/videos

FDM (Fused Deposition Modeling)

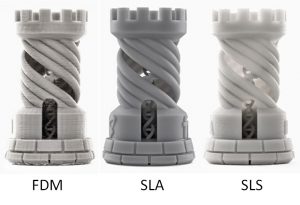
In FDM (Fused Deposition Modeling) in most cases when you bring up 3D printing to someone though they may not know it FDM is the process they are probably thinking of.  However, this method typically is not going to be producing the same detail nor quality of parts that is achievable with SLS and SLA Additive Manufacturing methods.  That being said it has many positives.  FDM uses a Filament which typically comes in a 1.75~3mm diameter extrusion that is wrapped in 1-5kg spools of material. This then gets threaded through the machine and pushed through a heated block causing it to melt as it nears the exit of the nozzle.  The melted filament is then deposited on a build platform creating a layer of the part. This method generally ranges from the .1~.3mm layer height. After each layer is complete the nozzle is raised (or the build plate is lowered depending on the X,Y and Z axis layout of your printer).  Many machines on the market today also have the build platform which in many cases is heated as well.  This helps it adhere to the surface of the build plate and reduces warpage etc…  Depending on the part shape and the material as with SLA you may also need support material for the FDM process as well.  Common materials consist of PLA (Polylactic Acid), ABS (Acrylonitrile Butadiene Styrene), TPU (Thermoplastic Polyurethane) and seemingly limitless other varieties and blends of materials that have already been developed as FDM has risen to fame in the DIY community.  This method is by far and away the starting point for most 3D hobbyists.  As a reference below I have found another great video this time from i.materialize that is goes through a bit of a time lapse that is a good demonstration of the technology. 

To visit i.materialise YouTube channel click on this link below:                                 https://www.youtube.com/user/imaterialise/videos

Our Blog Posts